2.24.2012
DIY Luau Birthday Cake!!
In addition to crafting, we love to cook, bake, throw parties... anyway the the glam girls can express themselves, we are there!
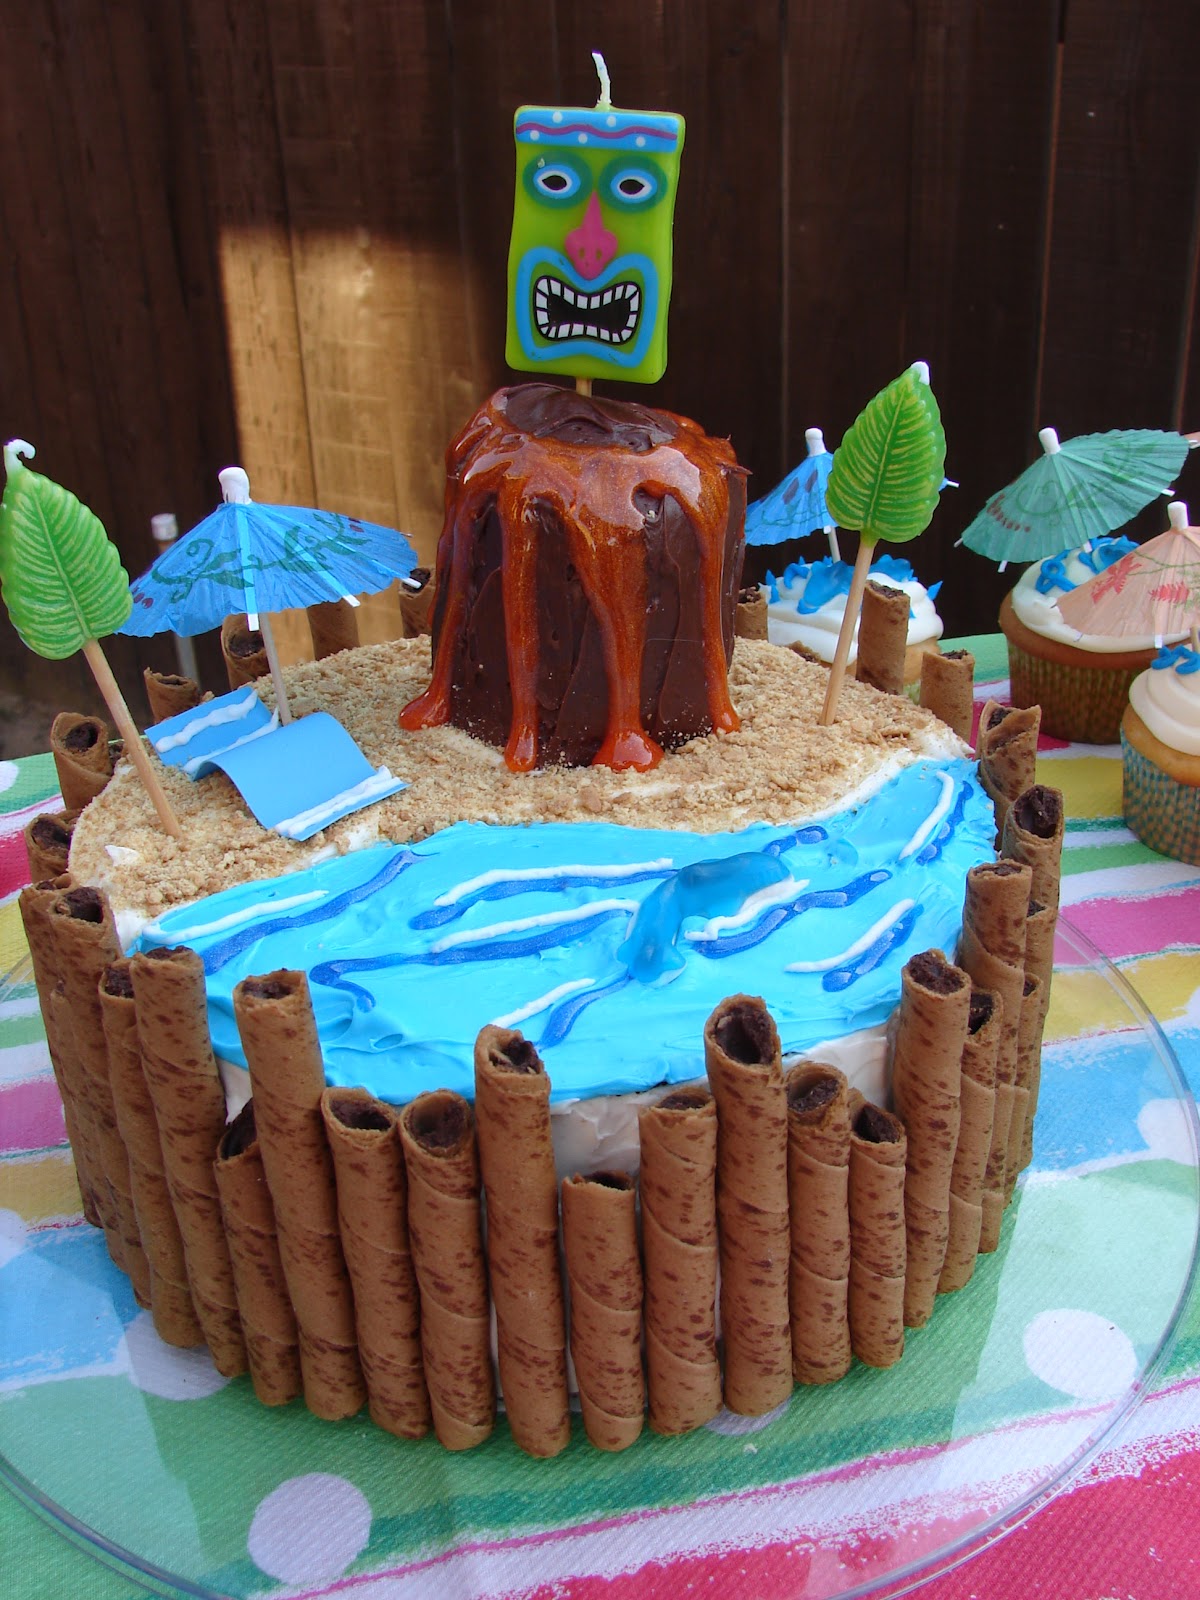
Just thought we would share a recent cake baking and decorating venture we decided to try, and to say so ourselves... it turned out pretty good! We made a yummy strawberry filled white cake decorated to look match the luau theme the party was. Since it was for the little man in our house, we had to included a shark in the water! We were inspired by a luau cake we saw http://www.kidsbirthdaycake-s.com/. We also made cupcakes topped off with their own umbrellas.
The party was a hit!
2.23.2012
DIY Baby Shower Card
Looking for a quick and and crafty solution for a DIY baby shower card? The glam girls have you covered! All you need are a few items to create your own handmade, one-of-a-kind card.
Here are the supplies I used:
Blank card
Aleene's Glue Stick and/or Tacky Glue (I used both)
Embroidery yarn
Circle stencil
Marking pen
Scissors
Buttons x 2
Scrap fabric
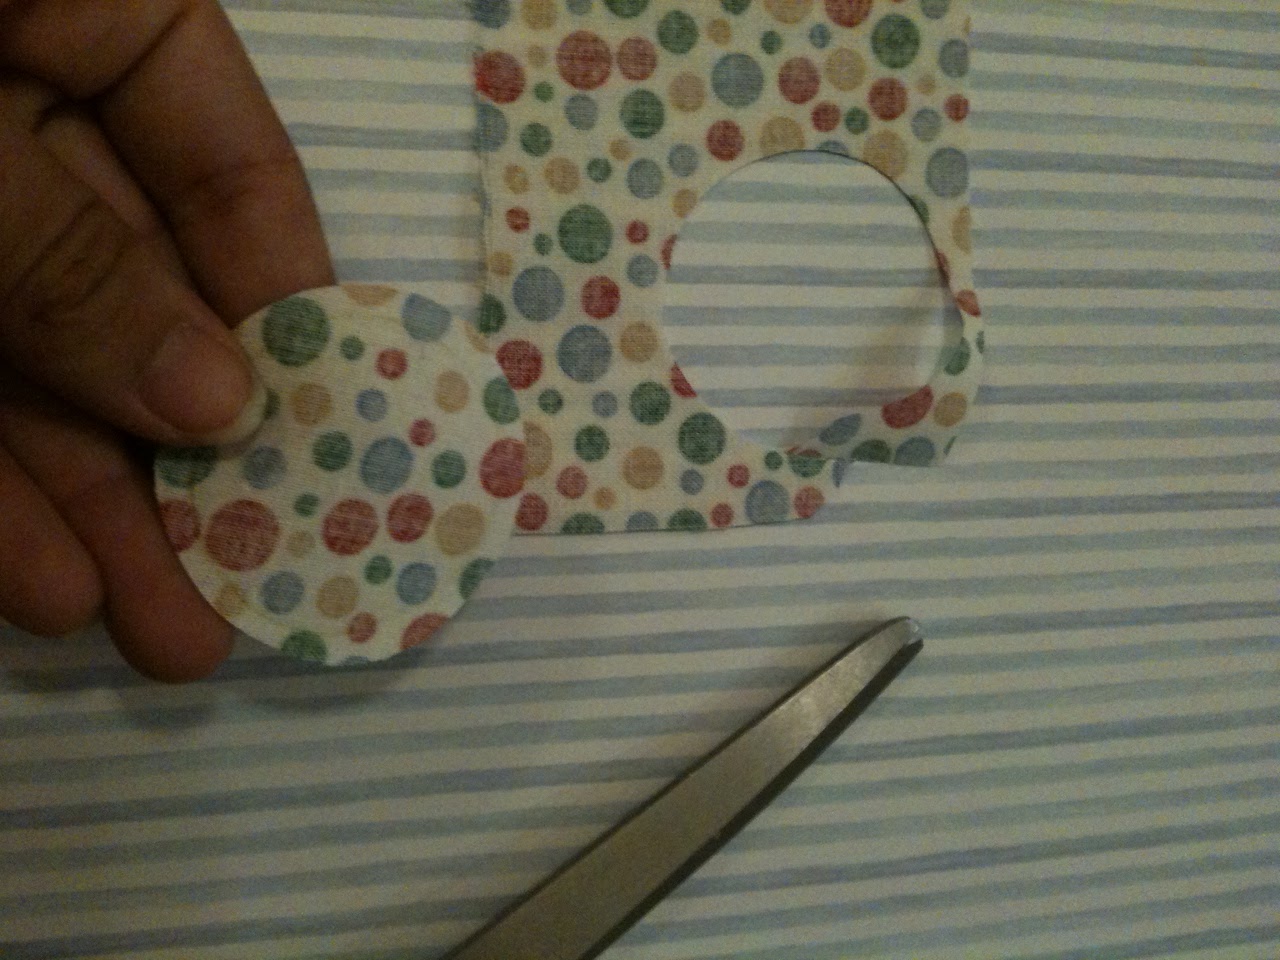
Trim a about a quarter of the fabric away to make the baby stroller.
Cut a piece of your embroidery yarn and glue to the card making the legs of the stroller.
Adhere the string (legs) and the scrap fabric (stroller) to the front of the card. Then use Tacky glue to adhere the buttons (wheels)
12.02.2011
Costumes for the School Play, 2011
| Reagan Elementary "We Are Monsters" cast with writer Denver Casado. |
Each year for the past three years, I have been lucky enough to be the costume manager for glam girl Imara’s school musical productions. Some people think I am crazy (50+ costumes, 2 ½ weeks) but I LOVE IT! My only complaint is that I wish I had more time! I always have ideas and sketches of what I want to do, but 2 ½ weeks is a short amount of time, and especially so when I work a 40+ hour week… . Needless to say, my ideas get cut short, but the outcome always seems to work. When the students love it, that is what matters. Those kids don’t have a filter and the truth always comes out, so when they are happy, I am happy!
This year they performed in the California debut of “We Are Monsters”, directed by Pete Van Der Paardt, and written in part by an alumnus of our school district, Denver Casado. He actually had two musicals debut this fall and both were just wonderful!
The premise of “We Are Monsters” is as follows:
Two gargoyles are emceeing the annual Monster Cabaret, where the monsters are free to just be themselves and perform to their heart’s content, without fear or judgment from humans. Four humans, however, sneak into the monster world to uncover the hidden lair of monsters and reveal it to the world! The human dress in poor disguises (which is hilarious) and the comedy ensues! The monster world is filled with werewolves, vampires, gargoyles, and one slime monster. Not to give too much away, in case you have the pleasure of seeing it, it ends happily, and is filled with a ton of comedy (that gains real laughter from adults) amazing music and songs. If you have the chance to see it or have the chance to produce it at your school, I highly recommend it!
Well, here is a quick glimpse of some of the costumes from the show – most of these are after the performance, so makeup is a bit messy, but you will get the idea. I cannot wait for next year’s show!
Labels:
Clovis Unified,
Denver Casado,
diy,
diy costumes,
halloween,
illustrations,
musical,
Reagan Elementary,
school,
school play,
theater,
vampire costume,
We Are Monsters,
werewolf costume
11.13.2011
Obsession with signs!
I am slightly obsessed with funny signs, strange signs, etc... I like to take pictures of interesting signs and have collected a few to share with you. In addition to my own pictures, I also saw some on Pinterest (another obsession of mine!) that I thought might make you giggle or go hmmm over. The stop sign and the 'window to the wall' sign were found on Pinterest.
Most of these I took in the UK and were quite interesting. Instead of yield, the signs said "Give Way", a term we had to get used to. Another one was a men's restroom for people walking down the street - you would never know it's there (especially since it was down through an underground staircase!)but there were these signs along the sidewalk identifying them. Or in London, a blue bin, not exactly a sign, but interesting nonetheless. Located by a mailbox and trash can, there was this big blue bin with the words "knife bin" on it. I never found out what that was for. If you have any idea, please clue me in! Anyway, I hope you enjoy, I know I did!
7.31.2011
Tie Dyed Socks!!
glam girl Imara made these great tie dyes socks and we thought we would share with you. WHat do you do when you have too many boring white socks? Dye them and make them FUN! Here is a simple tutorial that you can use the next time you are tired of wearing the same old white socks. Enjoy!
What you'll need:
Tulip tie dye kit
White socks (made with over 50% cotton)
Surface cover (we used a trash bag)
Step 1: Rubber band your socks where you want them to remain white.
Step 2: Fill your dye bottles with water and squirt all over the fabric. Be sure to flip the socks over so you get both sides.
Step 3: Wrap them up in the plastic and let them sit for 3-4 hours.
Step 4: Rinse the socks out and take off the rubber bands.
Step 5: Wash your socks by themselves in the washer on cold on a large load setting. Dry them by hanging or in the dryer.
Tah-dah!! You have just added some personality to your socks. Now get out there and show them off!!
7.15.2011
Amazing Art by Katie Daisy
I stumbled upon some beautiful and inspiring pieces of art on Pinterest (my addiction... if you visit the site you will never be able to leave!) and they are so bright and uplifting, I wanted to share with you. This is by an artist named Katie Daisy, check her out, you will love her illustrations. Good night!
6.01.2011
An Apron for Mom!
by: glam girl Collette
My sister and I have a crafty little business - official launch and details to come later... but, take a look at this little apron we made for our wonderful mom!
5.27.2011
30th Birthday Cupcakes!
by: glam girl Collette
I recently turned the big 3-0 and my amazing sister baked me the most delicious cupcakes, take a look at these! Seeing as how I LOVE chocolate and peanut butter, she made her special Chocolate Peanut Butter cupcakes topped with an amazing chocolate ganache and crumbled peanut butter cups... Move out of my way, my belt is loosened and I am going for the one in the middle topped with all of those peanut butter cups...yummmm...
5.22.2011
Awesome Home Made Watering Can!
by: glam girl Imara
A month ago, my mom, glam girl Collette, my little brother and I all went to Target to buy some stuff and then my little brother said," Let's go to the dollar section and get toys." So, my mom said yes and after all the shopping we finally went to that section. All Kaden and I bought was planting supplies and seeds. My mom was a little confused that we didn't go straight to the candy and toys but she still said we can get it. We got home and planted them and took care of them for so long until it was time to take them outside. But then we realized we didn't have a watering can. We didn't want to use the hose because it shoots out a little to much water. So, then an idea popped in my head. I ran inside and got a plastic cup and then I got my scissors a poked little holes into the bottom of the cup and then went outside.I turned on the watering hose and poured the water inside the cup. Now, it poured a great amount of water.
![]() |
| Make sure you have an adults permission before poking holes. |
![]() |
| Now there are hole at the bottom of the cup |
-glam girl Imara
4.22.2011
Coolest Place to Work Ever!
by: glam girl Collette
I would like to share with you a little bit about my work day today, if you don't mind... the company I work for is incredibly creative, being that it is a company the makes craft supplies and all! Well, today we had our monthly update meeting with our entire sales/marketing/art division. While we normally talk about business, etc. today our CCO (Cheif Creative Officer - how cool is that! How many companies have an executive management title like that? Love it!) said the theme for today's meeting was "INSPIRATION." The meeting room was set up with tables, chairs, our Tulip markers and art paper.
"...hmm," I wondered, "what is she going to have us do?" The room was buzzing with thoughts and speculations as to what our 'monthly business meeting' was to entail.
She did not keep us waiting for long! She challenged us to come up with inspirational quotes or sayings that help lift our spirits. We were instructed that these were not to be work related, but rather should be personally inspiring. The whole team had to come up with their own and then illustrate it on paper - I then figured out what the markers and paper were for! After we completed them, we all stood up one-by-one and read ours aloud to the group. Let me tell you, there were some great ones (see images below). After the meeting concluded, we were instructed to hang them up all around our building so we can constantly stay inspired!
I have work at a few great companies in my time, but nothing like this one! Don't get me wrong, there is a LOT of hard work, but the energy is so amazing that I just had to share with you all! I hope you are all inspired and/or entertained. Have a great evening!
written by glam girl: Collette
I would like to share with you a little bit about my work day today, if you don't mind... the company I work for is incredibly creative, being that it is a company the makes craft supplies and all! Well, today we had our monthly update meeting with our entire sales/marketing/art division. While we normally talk about business, etc. today our CCO (Cheif Creative Officer - how cool is that! How many companies have an executive management title like that? Love it!) said the theme for today's meeting was "INSPIRATION." The meeting room was set up with tables, chairs, our Tulip markers and art paper.
"...hmm," I wondered, "what is she going to have us do?" The room was buzzing with thoughts and speculations as to what our 'monthly business meeting' was to entail.
She did not keep us waiting for long! She challenged us to come up with inspirational quotes or sayings that help lift our spirits. We were instructed that these were not to be work related, but rather should be personally inspiring. The whole team had to come up with their own and then illustrate it on paper - I then figured out what the markers and paper were for! After we completed them, we all stood up one-by-one and read ours aloud to the group. Let me tell you, there were some great ones (see images below). After the meeting concluded, we were instructed to hang them up all around our building so we can constantly stay inspired!
I have work at a few great companies in my time, but nothing like this one! Don't get me wrong, there is a LOT of hard work, but the energy is so amazing that I just had to share with you all! I hope you are all inspired and/or entertained. Have a great evening!
written by glam girl: Collette
4.21.2011
Spring has sprung!
by: glam girl Collette
I don't know about you, but when the weather starts changing and flowers start blooming, I cannot help but get he itch to start creating!Surprisingly, even though the lack of posts, I have been thoroughly busy with multiple projects! As they are all at a mid-point, I am waiting to share with you when they are finished. In the meantime, I thought I would share some of the beautiful pictures of what has been providing me with the "spring creativity push" here in Central California. Enjoy!
![]() |
| image: Fresno Bee |
![]() |
| Image: playfresno.org |
![]() |
| Image: playfresno.org |
3.21.2011
Tie Dyed Bedding!
Are you looking for a fun way to express yourself, and get some new bedding at the same time? Well, look no further! In just a couple of hours you can create a whole new look in your bedroom with very minimal investment.
We used:
- twin sized 100% cotton duvet set from Target
- Tulip tie dye kit - Aqua Chic
- plastic tablecovers (you can use any plastic cover to protect your work surface)
Step 1: Get your fabric wet - wring out excess water so it is damp. The water will help the dye penetrate the fabric.
Step 2: Prep your work area. I took a roll of plastic tablecover that we had from a birthday party at our house and cut out 6 foot long pieces. Then we placed them outside on a grassy area we were going to work on.
Step 3: Figure out what design you want - Imara only wanted a crinkled water kind of effect so she just scrunched up the fabric after she laid it out on the plastic.
Step 4: Salt and Dye!! Sprinkle rock salt (included in kit) over fabric. This will help create a watery effect. We filled the dye bottles with water and shook them around to mix the water and dye. The kit came with three colors - we used the spray nozzles that came in the kit on two of the colors and just squirted the third one on.
Step 5: Wrap the fabric up in plastic for about 4 hours.
Step 6: After four hours, rinse out the fabric until the water runs clear. Wash and dry.
ALL DONE! We love the way it turned out, what do you think?
~the glam girls
Labels:
bedding,
child,
diy,
girl's room,
ilovetocreate,
joann,
redeocrate,
Target,
teen room,
tie dye,
Tulip
Subscribe to:
Posts (Atom)